Getting Started with the Node4 API: First Key, First Request
Create a scoped API key, make your first call, read the JSON envelope, then list your proxies and check this month's usage from curl, Node.js or Python.
Create an API key in the dashboard, send it in an Authorization: Bearer header to https://node4.io/api/v1/profile, and a 200 with your account details means everything is wired up. From there, two more calls (GET /proxies and GET /usage) give a script your proxy list and this month's consumption. This page walks through those steps in curl, Node.js and Python. Every endpoint, field and scope is listed in the management API reference.
What you need
- A Node4 account. Any account can create keys, including a free one, and the calls on this page work on every plan.
- Somewhere server-side to run code: a terminal with
curl, Node.js 18 or later (it hasfetchbuilt in), or Python 3 with therequestspackage (pip install requests). - About five minutes.
The API is for servers and scripts, not web pages. It sends no CORS headers, so a browser will refuse the call, and a key embedded in front-end code is public to anyone who views the source.
1. Create a key with only the scopes you need
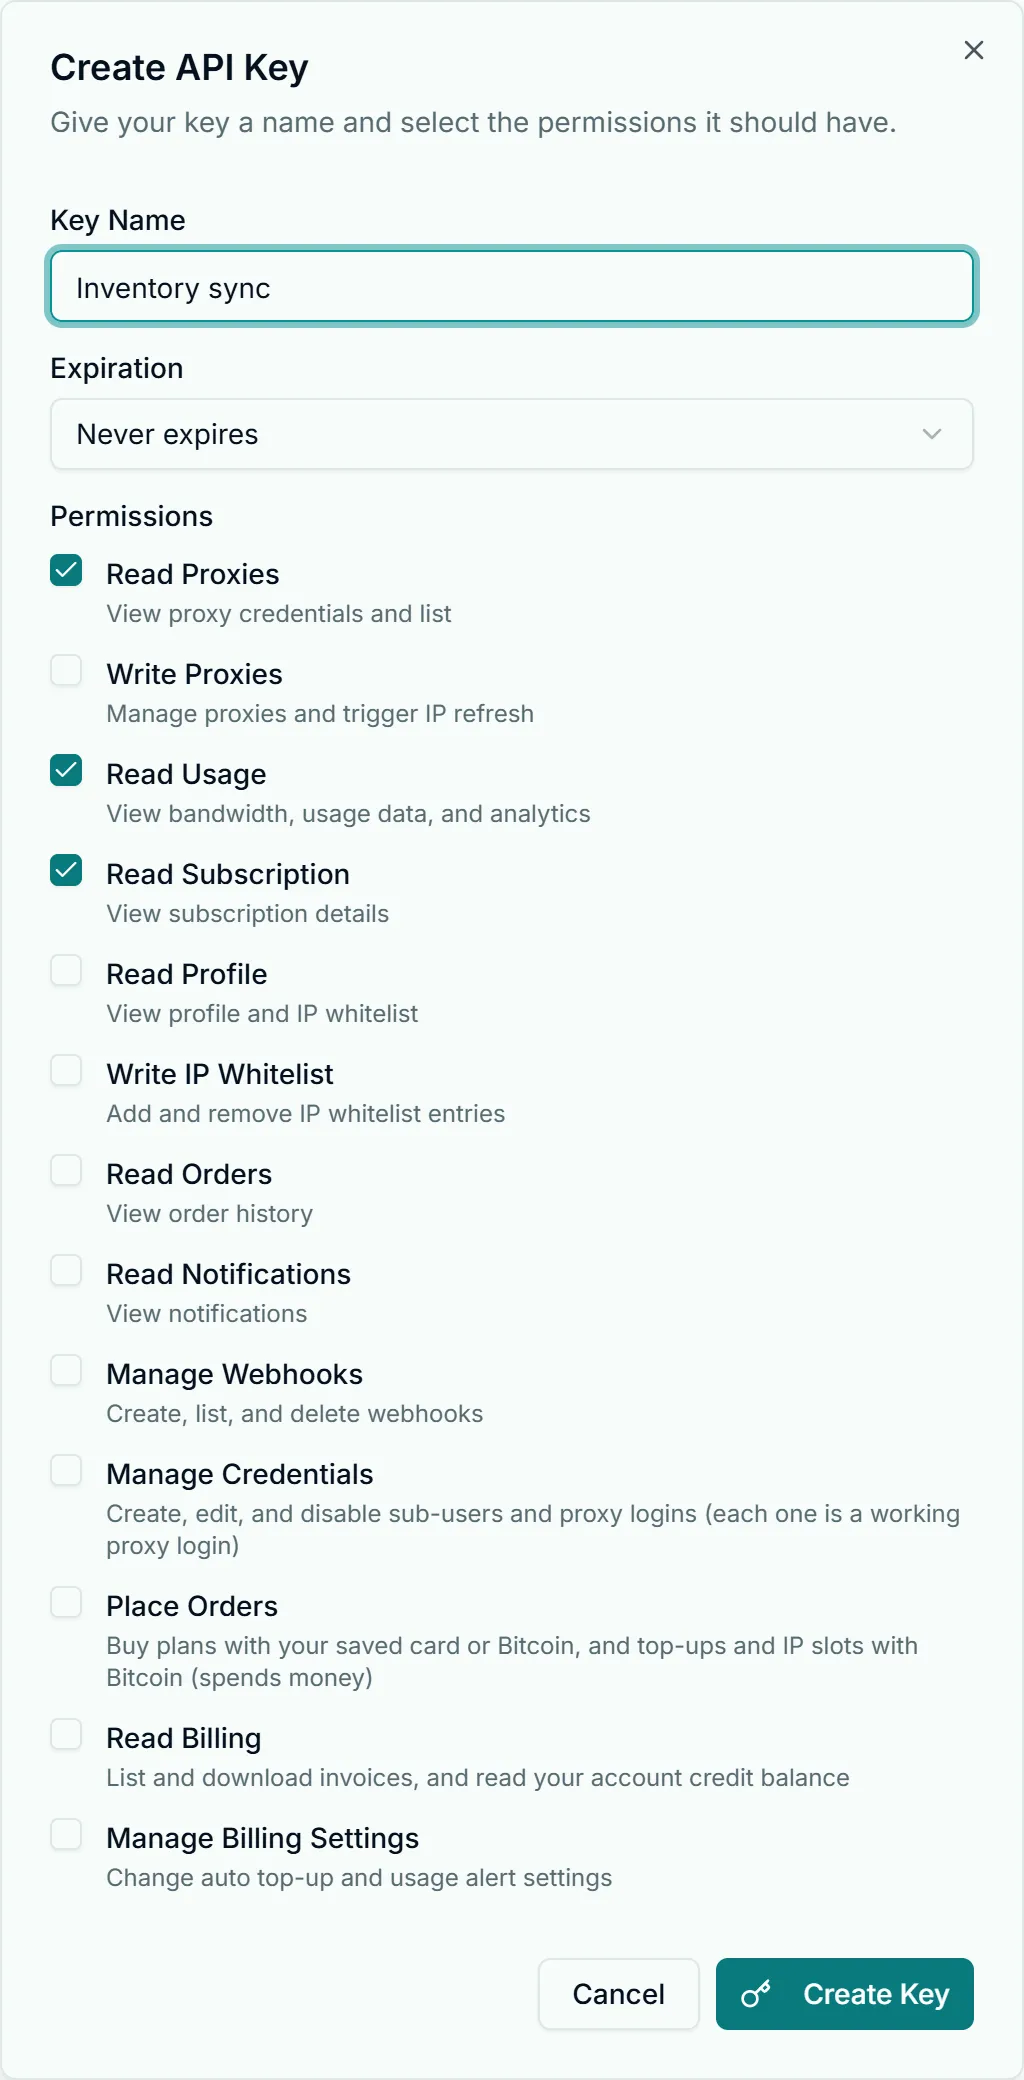
Open Account Settings → API & Webhooks and choose Create Key. The dialog asks for three things:
- Key Name. Name it after the job that will use it, for example
inventory-sync, so you can tell keys apart in the list later. - Expiration. Never, 30, 90 or 180 days, or 1 year. A key used for a one-off experiment should expire.
- Permissions. Each endpoint needs exactly one scope. For this walkthrough tick
read:profile,read:proxiesandread:usage, and leave everything else off.
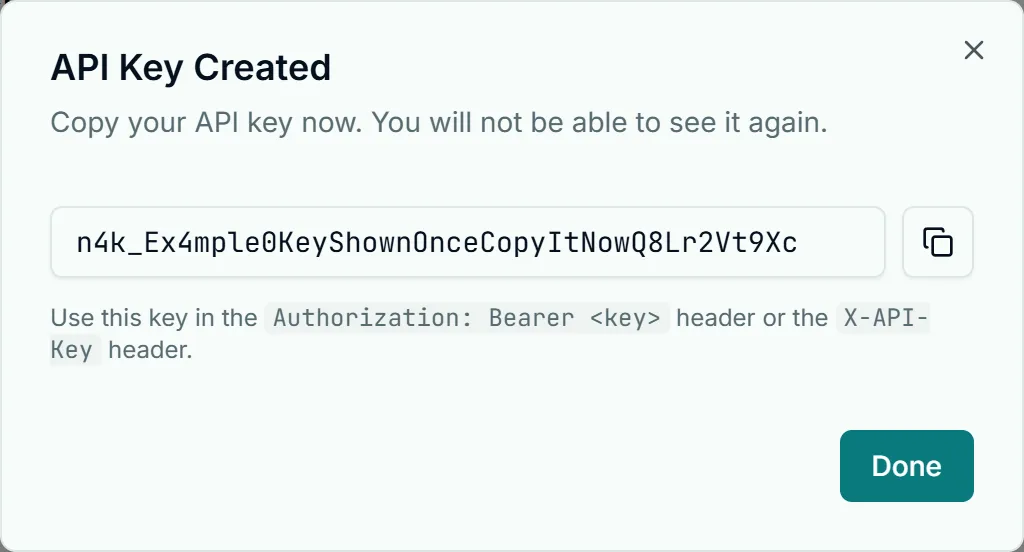
The full key, starting n4k_, appears once, in the confirmation dialog. Copy it into your secret store or an environment variable straight away; Node4 keeps only a hash, so the value cannot be shown again. If you lose it, create another key and revoke the old one.
Two scopes deserve a second thought before you tick them. read:proxies returns working proxy usernames and passwords, so a key holding it is as sensitive as the proxies themselves. write:orders can spend money. Keeping API keys secure covers storage, rotation and what to do if a key leaks.
Every example below reads the key from an environment variable:
export NODE4_API_KEY="n4k_your_key_here"2. Make your first request
GET /profile (scope read:profile) is the cheapest way to prove the key works, because it touches nothing but your account record.
curl -s -H "Authorization: Bearer $NODE4_API_KEY" https://node4.io/api/v1/profile// node first-call.mjs
const res = await fetch("https://node4.io/api/v1/profile", {
headers: { Authorization: `Bearer ${process.env.NODE4_API_KEY}` },
});
console.log(res.status, await res.json());import os
import requests
res = requests.get(
"https://node4.io/api/v1/profile",
headers={"Authorization": f"Bearer {os.environ['NODE4_API_KEY']}"},
timeout=30,
)
print(res.status_code, res.json())A working key returns 200:
{
  "success": true,
  "data": {
    "id": 364001,
    "name": "Jordan Lee",
    "email": "jordan@example.com",
    "role": "user",
    "createdAt": "2026-09-02T14:11:08.000Z"
  }
}
If your HTTP client makes custom Authorization headers awkward, X-API-Key: n4k_... is accepted instead. Send one or the other, not both.
3. Read the response envelope
Every endpoint answers in the same shape, so one helper can handle all of them.
| Outcome | HTTP status | Body |
|---|---|---|
| Success | 200 (or 201 for a purchase) | { "success": true, "data": { ... } } |
| Failure | 4xx or 5xx | { "error": "Human-readable reason" } |
| Purchase failure | 4xx or 5xx | { "error": "...", "code": "card_declined" } |
Branch on the HTTP status first, then on code where one is present. The error text is written to be shown to a person, but it can be reworded, so do not match on it. Two first-call failures are common:
401withMissing or invalid API key: the header is missing, misspelled, or the value does not start withn4k_(a stray quote or aBearer Bearerprefix both cause this).403naming a permission, such asThis endpoint requires the 'read:profile' permission: the key works but was not granted that scope. Create a new key with the scope; scopes cannot be added to an existing key.
The full list of statuses and codes, and what to do with each, is in API errors, rate limits and retries.
A small wrapper keeps the rest of your code free of this plumbing. In Node.js:
const BASE = "https://node4.io/api/v1";

export async function node4(path, init = {}) {
  const res = await fetch(BASE + path, {
    ...init,
    headers: {
      Authorization: `Bearer ${process.env.NODE4_API_KEY}`,
      "Content-Type": "application/json",
      ...init.headers,
    },
  });
  const body = await res.json();
  if (!res.ok) {
    const err = new Error(`${res.status} ${body.code ?? ""} ${body.error}`.trim());
    err.status = res.status;
    err.code = body.code;
    throw err;
  }
  return body.data;
}
And in Python:
import os
import requests

BASE = "https://node4.io/api/v1"
session = requests.Session()
session.headers["Authorization"] = f"Bearer {os.environ['NODE4_API_KEY']}"


def node4(method, path, **kwargs):
    res = session.request(method, BASE + path, timeout=30, **kwargs)
    body = res.json()
    if not res.ok:
        raise RuntimeError(f"{res.status_code} {body.get('code', '')} {body.get('error')}")
    return body.get("data")
4. List your proxies
GET /proxies (scope read:proxies) returns every proxy on the account with its connection details and status:
curl -s -H "Authorization: Bearer $NODE4_API_KEY" https://node4.io/api/v1/proxiesconst { total, active, proxies } = await node4("/proxies");
for (const p of proxies.filter((p) => p.status === "active")) {
console.log(`${p.protocol}://${p.username}:${p.password}@${p.host}:${p.port}`, p.country);
}
console.log(`${active} of ${total} proxies active`);data = node4("GET", "/proxies")
active = [p for p in data["proxies"] if p["status"] == "active"]
for p in active:
print(f"{p['host']}:{p['port']}", p["country"], p["expiresAt"])
print(f"{data['active']} of {data['total']} proxies active")The list includes expired and suspended proxies too, which is why the examples filter on status. Static proxies that sign in with your account credential come back with that credential filled in; an account with no active proxy credential gets empty username and password fields, because there is no login to show (authentication explains the sign-in options).
If you only need lines to paste into a scraper or proxy checker, GET /proxies/list?format=txt returns active proxies as host:port:username:password, one per line. The reference covers the other formats.
Rotating and residential plans connect through a gateway hostname rather than a list of IPs, so their connection strings come from the gateway endpoints described in the reference.
5. Check this month's usage
GET /usage (scope read:usage) reports bandwidth for the current calendar month and for the life of the account:
curl -s -H "Authorization: Bearer $NODE4_API_KEY" "https://node4.io/api/v1/usage?limit=10"{
"success": true,
"data": {
"bandwidth": {
"uploadBytes": 1288490188,
"downloadBytes": 20401094656,
"totalBytes": 21689584844,
"totalFormatted": "20.20 GB",
"totalRequests": 418230,
"period": "current_month"
},
"allTimeBandwidth": { "totalBytes": 96636764160, "totalRequests": 1904551 },
"recentLogs": [ { "proxyId": 1201, "requestCount": 912, "bandwidthDownBytes": 48211968 } ]
}
}(Trimmed: the real response also carries the formatted upload and download figures and more fields per log row.)
To compare consumption against what your plan allows, add GET /subscription (scope read:subscription, which you would need to grant), whose bandwidthLimitBytes is null on unmetered plans:
used = node4("GET", "/usage")["bandwidth"]["totalBytes"]
sub = node4("GET", "/subscription")["subscription"]
limit = sub["bandwidthLimitBytes"] if sub else None
if limit:
    print(f"{used / limit:.0%} of the allowance used this month")
else:
    print(f"{used / 1024**3:.2f} GB used this month (no byte allowance)")
The usage figure covers the calendar month while /subscription reports the plan's own currentPeriodStart and currentPeriodEnd, so treat the percentage as a guide when your billing period does not start on the 1st.
For history rather than a running total, GET /usage/bandwidth?days=30 returns hourly snapshots; the usage section of the reference lists the per-proxy, hourly and daily breakdowns. If the month is running out of allowance, bandwidth top-ups add more without changing your plan.
Limits that apply
- Rate limit. Each key may make 60 requests per minute, on every plan. Every response reports how many remain in
RateLimit-Remaining. A script polling every few seconds will hit it; one that checks usage every few minutes never will. - Per-IP limit. All requests from one IP also share 300 requests per minute across
/api, whatever key they use. Its429saysToo many requests from this IPand carriesRetry-After. - One key, one set of scopes. Scopes are fixed when the key is created. Give each integration its own key so a revoked or rate-limited key affects only that job.
- Server-side only. No CORS, as noted above.
- What the API does not do. It cannot change or cancel a plan, add a payment method or manage team members; those stay in the dashboard.
If something does not work
401on every call: print the exact header you are sending. The value must beBearerfollowed by the wholen4k_key.403naming a permission: create a key that includes it.404withNo API endpoint matches: check the path against the reference; it is case-sensitive and starts with/api/v1.429: you have used this minute's requests. Wait for the number of seconds inRetry-After.- An empty
proxiesarray: the account has no static proxies yet. Plans are on the pricing page, and they can also be bought over the API, as described in buying plans and top-ups with the API.
Where to go next
- Every endpoint: the management API reference, plus the machine-readable OpenAPI document at https://node4.io/openapi.json, which Postman, Insomnia and code generators can import.
- Buying from a script: buying plans and top-ups with the API.
- Production hardening: API errors, rate limits and retries.
- Client libraries and Postman: Node.js and Python client libraries and a Postman collection are available on request from support. They are not published as public packages yet; the reference describes what they handle for you.
- What each product includes: the features page.